I freshly arrived in a new working environment and the first thing I did was to run an Ubuntu Linux instead of Windows. However some things are only accessible under Windows so I googled a bit in order to find an easy way to boot Windows XP from my existing Windows partition which comes by default with the PC we have here.
So this is possible with virtual box 1.5.4 which can be downloaded from here and this is generally called booting from a raw partition.
Once virtual box installed, you can use the tool VBoxManage to create a disk image (vmdk) pointing to your partition.
RAW host disk access VMDK file ./WinXP.vmdk created successfully.
my-desktop:>
Note that if you also want to directly register your image to VirtualBox you can also use the -register option.
The previous VBoxManage command will work but is extremely dangerous as in the virtual machine, you have access to all your partitions and you could inadvertently boot the host OS as a guest OS (the host being Ubuntu in my case) !!!
This could create incurable damages to your installation so the solution to avoid that is to create the disk image and restricting it only to the windows partition.
You will also have to create in a file a new master boot manager which will concern only the windows partition and use the new mbr to create the disk image.
1) Create a Master Boot Record manager in a file
To do this you need to use install-mbr which is part of the Debian package mbr and call install-mbr with the --force option:
The produced file myBootRecord.mbr should be 512 bytes.
2) Call VBoxManager with the right options
First we need to know which is our WinXP Partition:
For me it is the partition number 1. Here is the magic command:
Now we have a virtual disk call WinXP.vmdk which will allow us to boot our existing partion.
3) Use the VirtualBox GUI to create a new Virtual Machine Profile
Now let's launch VirtualBox to create and configure a Virtual Machine.
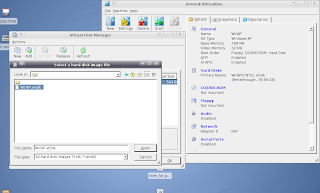
The first thing to do is to use the Virtual Disk Manager to add the newly created disk:
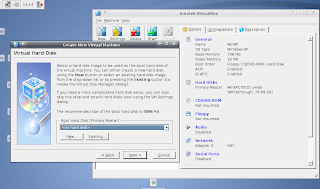
 Now, let's create a virtual machine with this new disk:
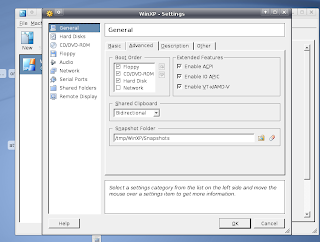
 Finally you will have to tweak the options and especially tick the Enable IO APIC value:
 4) The Conclusion
If you are lucky you should then be able to run WinXP and access all the network disks already configured by your wonderful Win Admin => Good !!
Note that you should create another Hardware profile in WinXP to not confuse it too much as the virtual machine might comes with some cruder hardware devices (sound card, graphic card, etc).
There could also be an issue regarding the write permssions on your "hard drive" if you want to run your Virtual Machine as a standard user. You might need a chmod 777 /dev/sda with /dev/sda unmounted.
 5) References
Here are the two threads which helped me find a solution for my problem
http://forums.virtualbox.org/viewtopic.php?t=333&highlight=createrawvmdk
http://forums.virtualbox.org/viewtopic.php?t=2019
So this is possible with virtual box 1.5.4 which can be downloaded from here and this is generally called booting from a raw partition.
Once virtual box installed, you can use the tool VBoxManage to create a disk image (vmdk) pointing to your partition.
#>VBoxManage internalcommands createrawvmdk -filename ./WinXP.vmdk -rawdisk /dev/sda
VirtualBox Command Line Management Interface Version 1.5.4
(C) 2005-2007 innotek GmbH
All rights reserved.
VirtualBox Command Line Management Interface Version 1.5.4
(C) 2005-2007 innotek GmbH
All rights reserved.
RAW host disk access VMDK file ./WinXP.vmdk created successfully.
my-desktop:>
Note that if you also want to directly register your image to VirtualBox you can also use the -register option.
The previous VBoxManage command will work but is extremely dangerous as in the virtual machine, you have access to all your partitions and you could inadvertently boot the host OS as a guest OS (the host being Ubuntu in my case) !!!
This could create incurable damages to your installation so the solution to avoid that is to create the disk image and restricting it only to the windows partition.
You will also have to create in a file a new master boot manager which will concern only the windows partition and use the new mbr to create the disk image.
1) Create a Master Boot Record manager in a file
To do this you need to use install-mbr which is part of the Debian package mbr and call install-mbr with the --force option:
#> apt-get install
#> install-mbr --force myBootRecord.mbr
The produced file myBootRecord.mbr should be 512 bytes.
2) Call VBoxManager with the right options
First we need to know which is our WinXP Partition:
#>fdisk -l /dev/sda
Disk /dev/sda: 82.3 GB, 82348277760 bytes
255 heads, 63 sectors/track, 10011 cylinders
Units = cylinders of 16065 * 512 = 8225280 bytes
Disk identifier: 0xf3c1f3c1
Device Boot Start End Blocks Id System
/dev/sda1 * 1 2623 21069216 7 HPFS/NTFS
/dev/sda2 2624 9704 56878132+ 83 Linux
/dev/sda3 9705 10011 2465977+ 5 Extended
/dev/sda5 9705 10011 2465946 82 Linux swap / Solaris
For me it is the partition number 1. Here is the magic command:
#>VBoxManage internalcommands createrawvmdk -filename ./WinXP.vmdk -rawdisk /dev/sda -partitions 1 -mbr ./myBootRecord.mbr -relative -register
VirtualBox Command Line Management Interface Version 1.5.4
(C) 2005-2007 innotek GmbH
All rights reserved.
VirtualBox Command Line Management Interface Version 1.5.4
(C) 2005-2007 innotek GmbH
All rights reserved.
Now we have a virtual disk call WinXP.vmdk which will allow us to boot our existing partion.
3) Use the VirtualBox GUI to create a new Virtual Machine Profile
Now let's launch VirtualBox to create and configure a Virtual Machine.
The first thing to do is to use the Virtual Disk Manager to add the newly created disk:
 Now, let's create a virtual machine with this new disk:
 Finally you will have to tweak the options and especially tick the Enable IO APIC value:
 4) The Conclusion
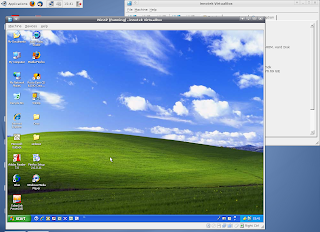
If you are lucky you should then be able to run WinXP and access all the network disks already configured by your wonderful Win Admin => Good !!
Note that you should create another Hardware profile in WinXP to not confuse it too much as the virtual machine might comes with some cruder hardware devices (sound card, graphic card, etc).
There could also be an issue regarding the write permssions on your "hard drive" if you want to run your Virtual Machine as a standard user. You might need a chmod 777 /dev/sda with /dev/sda unmounted.
 5) References
Here are the two threads which helped me find a solution for my problem
http://forums.virtualbox.org/viewtopic.php?t=333&highlight=createrawvmdk
http://forums.virtualbox.org/viewtopic.php?t=2019